Aircraft of the Month
You can find the current and past featured aircraft here.
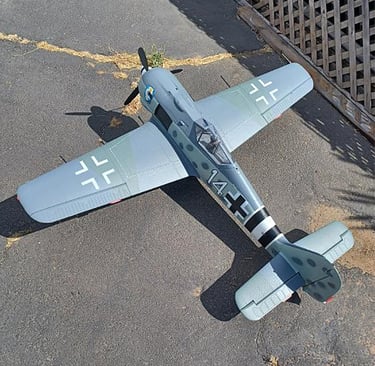
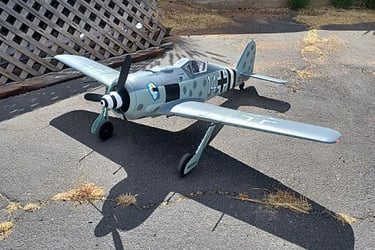
JULY 2026 FEATURED AIRCRAFT: Focke-Wulf Fw 190A
THIS MONTH WE FEATURE AN AIRCRAFT SELECTION FROM CLUB MEMBER PHIL BROWN
This is my E-flite Focke-Wulf 1.5 meter. It's got all the typical E-flite options of BNF, AS3X and SAFE. I use a 6s 5200mAh battery, it's got plenty of power, but I think it can take up to 7000mAh.
This is a beautiful plane. It looks really scale in the air and up close it has really nice rivet details. I also like the bulldog stance of the wide landing gear. It flies wonderfully every time, super stable and easy to control. The landings can be a bit tricky, I've had a lot of bouncy ones. The split flaps help but you still need to grease it in for a perfect landing. I am going to get some softer wheels eventually, that should help.
The wing tips pop off for transportation purposes and it has really bright nice lights on the wing tips and rear of the rudder. I always have a good time with it when I bring it out, it's a joy to fly. It is a discontinued model so finding it might be difficult but I'd recommend it.


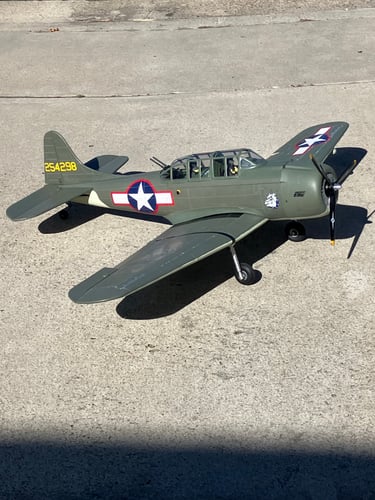
JUNE 2026 FEATURED AIRCRAFT: A-24 BANSHEE
As most of my fellow flyers have seen, I am a warbird fan. Why? I think its genetic. Dad was a WWII Navy pilot back when enlisted sailors cold be pilots. I grew up watching my favorite TV show, Victory at Sea which was all about carrier operations during WWII. I have the series on CD. At 20, I joined the Navy and went right into the Naval Aviation. To me the Navy was more about their airplanes than their ships.
In my RC squadron I have the following model Warbirds, in no particular order:
• Navy F6F Hellcat , Foam.
• Marine Corsair, Foam
• Navy PT-19, Balsa
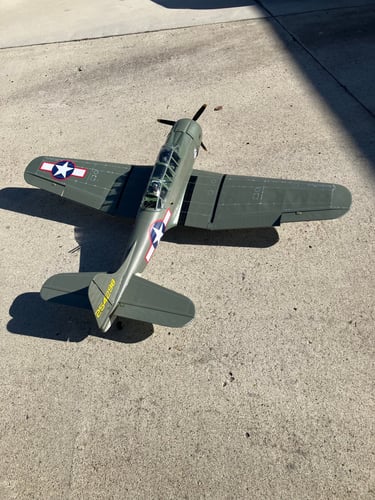
• Army P40 Warhawk, Balsa (picture of it on the website)
• Navy SBD Dauntless. Balsa still in the box.
• Army P-38 Lighting , Balsa
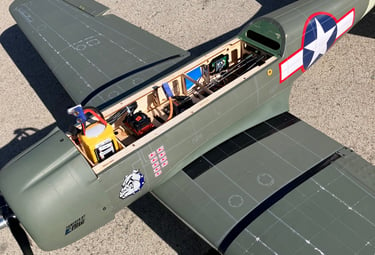
• Army A-24 Banshee, Balsa (Army’s version of the Dauntless
• Army P-47 Thunderbolt, Balsa
I could pick any one of these as my plane of the month but I’m currently breaking in my A-24 Banshee and therefore have picked it for this article. They are all “my favorite”. After all the Navy talk, I go with an Army plane. But it’s bones are really the Navy SBD. The Army was complaining that it didn’t have this weapon so they gave the Army the A-24 to stop their whining.
You don’t hear much about this plane’s contribution to the Army’s effort. But this plane turned the tide of the war in the Pacific in the Battle of Midway.
The kit is a basic ARF, nothing but the balsa parts. I like selecting my own motor and ESC. For the motor selection my rule of thumb is 150watts/pound of plane. This model came in at a few ounces shy of 10 lbs. So using my of thumb, I need a 1500 watt motor. I don’t pay much attention to the KV spec, it not factored in to my selection criterion.
The motor I selected to put in it was an Eflite Power 52 which is rated at 1650 watts motor, close enough. This motor requires a 80 amp ESC. I usually go with an Avian ESC I find them reliable and I’m also able to program them for reverse thrust breaking. On our new and improved runway, my balsa models like to use all 300 ft of it. So braking is very handy feature. Saves me from weed whacking with my plane. Love the new runway surface.
I selected a 13-6 , 3-blade propeller. I prefer the tri-bladed props for tail draggers so I can get more ground clearance which helps me avoid striking the runway with the prop tip especially when the tail comes off the ground on take-off or at any other times when the tail comes up.
For the receiver, I chose the Spektrum AR637T+. This is my “go-to” receiver for most of my models. It has the following features that I like to use:
• 8 channels , this handles all the controls plus flight mode selection and reverse thrust selection.
• Telemetry capability. I use this feature for my AIM-33 stall warning system. Plus, I get ESC data during flight to keep me aware of my battery state and ESC temperature.
• It also has the SRLX2 port that allows you to install a back-up receiver. This additional receiver significantly reduces the number of frame losses and signal fades during a flight.
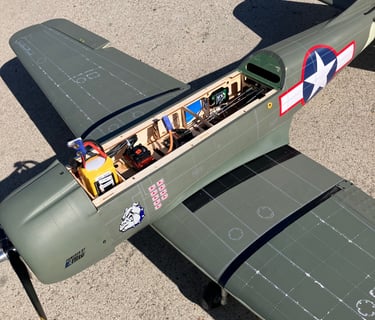
The model itself was well made. It has a 60” wingspan. It went together as the instructions called out. No surprises. The coving and details are great. But there were a few things I changed in order to improve flight performance and to make it less likely to stall. Here’s a list of mods that I considered as improvements.
• The tail wheel control original design was to piggy-back the tail wheel actuating control rod with the rudder control rod. I chose to separate those rods putting the rudder on the rudder servo by itself. Then I added a new,small servo in the tail section that would be dedicated to controlling the tail wheel directly. This way I could use different rates for the rudder and tail wheel and improve ground handling and maintaining good rudder control.
• The kit came with fixed landing gear. I upgraded with a retract set from Phoenix. Very nice retracts. They’re all metal, no plastic parts. I also used Dubro wheels, the low bounce variety. Helps soften the landings I make which aren’t always silky smooth.
• The model has dive flaps just like the real plane. I have no plans to execute a vertical dive as they did at the Battle of Midway. So I covered those flaps over with the vinyl they provided in the kit for repairs. And I made them fixed in the normal position. They don’t move. The regular flaps were also used to regulate the dive speed. They had similar holes cutout so they had reduced effect for approaches but definitely helped in deep dives to keep the dive speed below 300 mph. I covered the holes as well. Now I use the lower flaps as normal flaps are intended to be used.
• The model is inherently tail heavy. So, to reduce the lead required to balance it I located the battery in a vertical orientation as far forward as possible. This resulted in the battery’s center of mass further forward then if it was mounted in the usual horizontal orientation. This helped reduce the amount of additional lead required to get the cg within spec.
• Of course I’ve added my stall warning system which provides me with actual airspeed as long as its below 33 mph and it provides a stall warning by means of vibrating the transmitter if the speed drops to 23 mph.
That’s about it for deviations from the supplied building instructions.
I’ve been flying the plane for a few weeks and really am enjoying it. My models fall into one of three categories, 1, low anxiety, 2. medium anxiety and 3. high anxiety. I usually bring one from each category on flying days. This Banshee falls into category 3. That’s means besides being in the scariest category it also provides the most satisfaction when I taxi it off the tarmac in one piece. If you see me at the field please feel free to come have look.
Steve
THIS MONTH WE FEATURE AN AIRCRAFT SELECTION FROM CLUB MEMBER STEVE NUSSBAUM
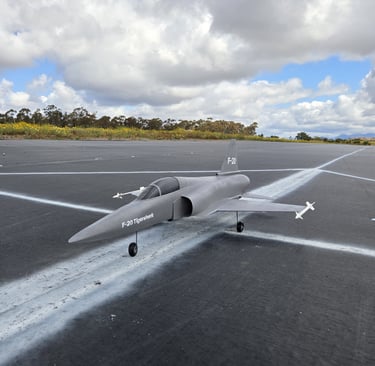
MAY 2026 FEATURED AIRCRAFT: Northrop F-20 Tigershark 3D Printed 50mm EDF Jet
THIS MONTH WE FEATURE AN AIRCRAFT SELECTION FROM CLUB MEMBER BENJAMIN
I have been practicing my CAD skills and wanted to design a flyable F-20 jet since there isn't really a kit or ARF available for it at the moment. This one flies great with just elevons and uses a 4S, 1500mah battery. It's printed out of LW-ASA which is very heat resistant so there isn't the worry of it melting in the summer months.
The most difficult part of designing it was just making the sleek, scale shape of the fuselage, and all together it took a couple of full days sitting at a desk on Fusion360. I will also be printing out a second version with aileron control soon, and if anyone else would like to print their very own Tigershark I have the files available here: https://cults3d.com/en/3d-model/game/f-20-tigershark-rc-plane-50mm-edf-jet


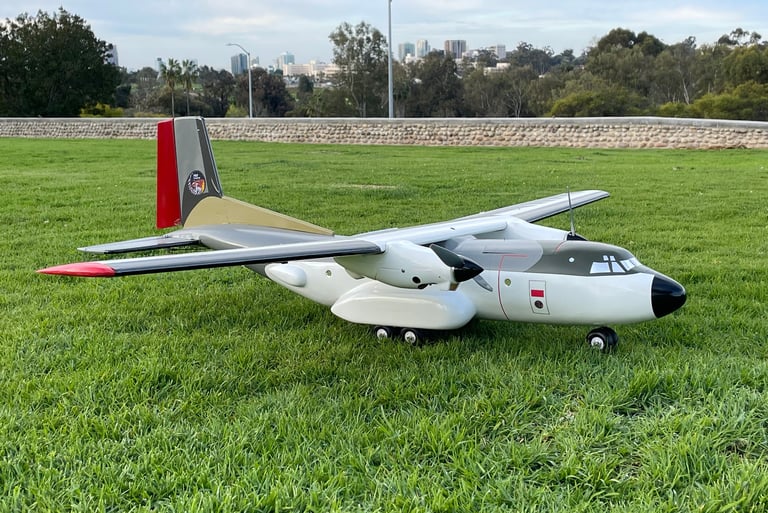
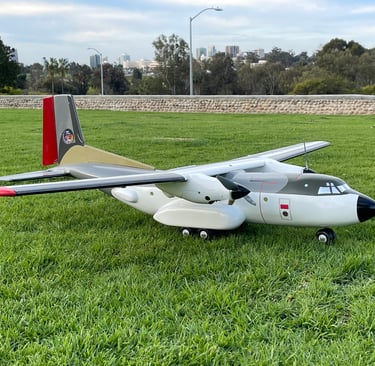
APRIL 2026 FEATURED AIRCRAFT: CMP Transall C-160
THIS MONTH WE FEATURE AN AIRCRAFT SELECTION FROM CLUB MEMBER RANDY MANNS (AMA# 1107302)
Here's one of three Transall C-160 Cargo Aircraft I enjoy flying. Interestingly, each ARF build was different. Two of them required significant modifications to the horizontal stab. Once the adjustments were made, they both flew with no bad tendencies. The wing loading is fairly high on these models due to the wing area, AUW, and the long barrel shaped fiberglass fuselage (creating much drag). But overall, each plane flies very well.
China Model Product (CMP)
CMP Transall C-160 Plane with twin Rimfire .15 motors; 50A ESCs; UBEC; Spektrum 8ch RX. Powered by a 4S 5000mAh Admiral Battery.
https://youtu.be/LHdBYIw0aZQ?si=F74HbgqVNxOpvmis
History:
The Transall Turns 60
https://www.airbus.com/en/newsroom/stories/2023-02-the-transall-turns-60
Thanks,
Rod
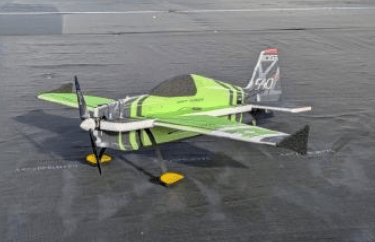
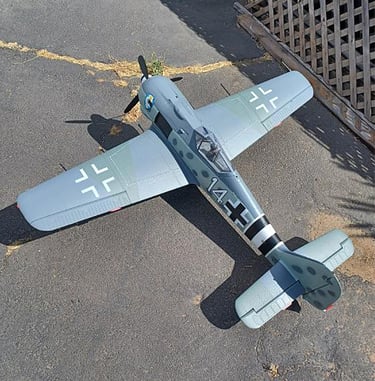
MARCH 2026 FEATURED AIRCRAFT: RC Factory 42" EPP Edge 540 XL
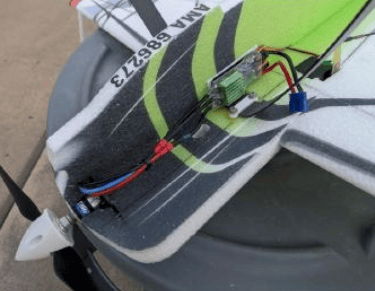
THIS MONTH WE FEATURE AN AIRCRAFT SELECTION FROM CLUB MEMBER PAUL SCHLITT (AMA 686272/FAA Registration #FA37WM3XE7)
Selected plane: RC Factory 42” EPP Edge 540 XL (distributed by Twisted Hobbies)
Model Specifications:
• Wingspan/Length = 42” (1060mm) / 43” (1120mm) AUW = 27 -30oz.
• E-flite 480 Brushless Outrunner Motor, 910 Kv: 3.5 mm Bullet
• Quantum 45A EVO Electronic Speed Controller
• HiTec HS-5087MH 21.9 g High Voltage Metal Gear Digital Micro Servo
• Flite Test Aura 5 Lite (6-axis flight stabilizer)
• Spektrum DSMX remote receiver
• Graupner E-Prop 12x6 (30-15cm)
• Thunder Power RC Elite Series 2250mAh 3-Cell 11.1V 55C LiPo
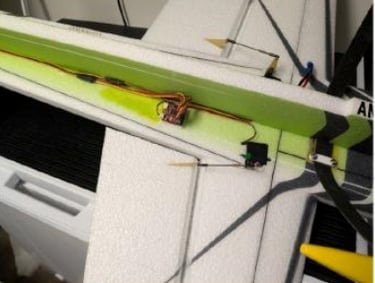
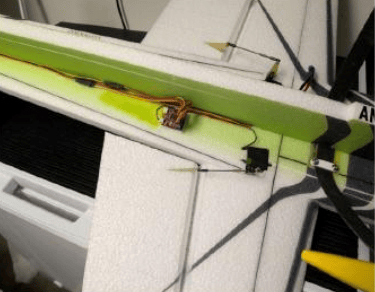
I selected this aircraft (Figure 1) as one of my favorites given that it has continues to help with improving my flight skills and the build is as simple as it gets. This plane is flown by a couple of other members at the field (far more proficient then me). It is designed for intermediate to advanced pilots. This plane differs from flat foamies, in that it has a symmetrical airfoil. It is designed for 3D aerobatics; however it’s also capable of precision aerobatics. You’ll find through your own research that the Edge 540 demonstrates very stable flight capabilities. I personally consider the flight characteristics of this plane are very predictable and it has allowed me to improve my skills in the area I’m focused on. Those characteristics are evident at slower flying (e.g., loops, snap-rolls, torque roll hover, high-alpha passes and inverted flight). This can be a benefit for pilots not accustom to 3D flying, thereby giving them time to react to their control inputs and build muscle memory in the process. The plane is benefited by its power to weight ratio.
The plane is made from expanded polypropylene foam (EPP), with carbon fiber flat strip used for structural reinforcement throughout the design (wings, fuselage, and elevator). The kit consists of eight pieces (and landing gear). I used Deluxe Material AD34 foam 2 adhesive for primary construction and foam safe cyanoacrylate glue (along with activator) for affixing carbon strip reinforcements. Upgrades are limited to an aluminum motor mount and fiberglass wheel pans. The kit come with EPP wheel pans, but depending on how rough you are with landings, you might find them breaking off. Although EPP is resilient to minor dig and dents, I elected to coat the leading edges of each control surface with foam armour (Deluxe Materials). You could accomplish the same thing with using blender tape (note, it might not stick as well), but I decided to try out the foam armour. So far I’m happy with this product.
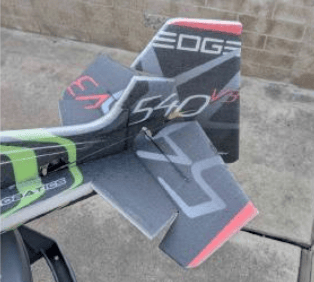
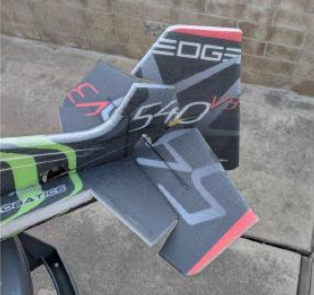
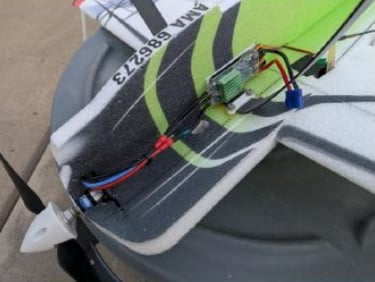
Due to its large control surfaces (Figure 2), I recommended that you use a good quality servo. When I was initially considering the purchase of this plane, one of the most beneficial recommendations that I found amongst the other superfluous information about the build was make sure you use high quality servos. The manufacture does provide a short build manual for their 42” EPP aircraft. There are lots of other posts for building this aircraft on the internet. My choice of motor and ESC is similar to what the manufacture recommends (Figure 3). Given the variable wind conditions at the field, I elected to use the Flite Test Aura 5 lite (Figure 4) for my receiver. This unit is 5 grams with flight control and stabilization functionality (3-axis gyro mode). I find this unit beneficial in reducing some of those environmental influences, thereby allowing me to focus on flying and improving a particular maneuver. However, it’s your choice on the receiver that you’re familiar with and that you’re comfortable with programming.
I elected to setup my flight modes on a three position switch, i.e., flight mode 1 is set to no stabilization, flight mode 2 is set to stabilization at midrates, and flight mode 3 is stabilization at 3D rates. I elected to place my gain settings on a dial knob so it can be tuned via the transmitter. The flight mode settings are very similar to those folks using a Spektrum AS3X+ receivers. Others might be using a particular receiver manufacture of their preference or assigning surface controls on individual switches.
I tried to focus on the key elements that I personally like and think are important when considering this plane. Currently, it’s hard for me to identify particular problems with how this plane performs, besides limits associated with my piloting skills. As I improve with a particular flight maneuver, my opinion could change.
Thanks for letting me share one of my favorite RC planes with you.
Figure 1.
Figure 2.
Figure 3.
Figure 4.